Curriculum links:
- Physics – Forces (mechanical, electrical and magnetic) – Learning about how magnets and electricity behaves
- Geography – The Earth’s magnetic field
- Engineering – How motors work and why we use compasses
Learning objectives:
- Investigate magnets and electricity.
- How they are used in the world around us
- Make mini robots called Bristlebots!
Materials:
- Bar magnets (for handing out to class and for battery coil demo)
- Iron filing cases
- Batteries and copper coil for Homopolar motors
- Human circuit LED tubes
- Compass
- Multimeter
- Bristlebot components
- Wire Stripper
Safety:
- The stronger magnets can snap together and pinch fingers or even damage phones and smart watches.
- Have wires prepared that are least 8cm and have 1.5cm exposed metal.
- Use numbered motors so the children can identify which robot is theirs in the battle.
- Make sure the motor has some glue or plastic on the rotator to cause the “shimmy” motion.
Instructions:
Activity 1: 5 mins
Ask the class what they know about magnets.
They will probably say “they have north and south ends that repel and attract”, maybe that Earth has magnetic poles. Magnets have a north and a south pole, opposites attract while likewise attract. Magnetic minerals can be found naturally but most ones we use are man-made.
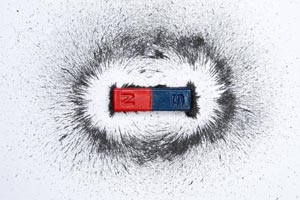
Hand out two magnets to each pupil for testing. If you wish, have them go around the classroom and find things attracted to the magnets. By doing this they will learn that magnets attract certain materials. (iron, nickel). Next introduce the concept of magnetic fields, the direction of the magnetic force in the space around the magnet. Hand out the iron filings cases and have the children hold the magnet underneath the case and shake the two together, the filings will arrange in spikes in the direction of magnetic field lines.
Now tell the children that the earth is one massive magnet because of its core! Tell them that the south of the Earths magnet is actually on the North Pole and vice versa. The Earth’s magnetic field plays an important role in keeping us alive. The sun blasts out radiation, but the magnetic field surrounding us pushes it away back into space, creating a beautiful effect in the sky. Ask the children if they can guess what this is. The Northern Lights are caused by the Earth’s magnetic field pushing away the sun’s radiation. That is why they are visible in countries closer to the magnetic poles.
Ask the children if they can guess what this is.
The Northern Lights are caused by the Earth’s magnetic field pushing away the sun’s radiation. That is why they are visible in countries closer to the magnetic poles.
Demonstration: 3 mins
Ask the children what else we can use magnets for.
Use the floating magnet to demonstrate how magnets will always align with the Earth’s magnetic fields. And that this is how a compass is made. Tell them compass are a very important navigation tool for mountain climbers, scuba divers and ships! Demonstrate how a magnetic field will interfere with the compass, and that this is the reason for many shipwrecks! Metal in the ship interfered with the magnets and pointed in the wrong direction!
Activity 2: 5 mins
Explain to the children that electricity cannot run unless it is in a circuit or loop. Demonstrate this with the Human Circuit LED tube. See if you can create a big human circuit in the room with all the children holding hands. Ask them to see what happens if they decide to touch each other’s hair instead of skin and explain how some materials let electricity through them while others don’t.
Next introduce the children to The Right-Hand Rule/Lorentz Force. Have them hold up their hands and tell them that if we combine magnets with an electric current, we can create a Force! Demonstrate this with the Homopolar Motor. Show and explain how the coil will not spin unless it in contact with the magnets as it must complete the circuit.
Demonstration: 5 mins
Ask the children what we can make using this special behaviour between magnets and electricity. Motors! Show the class the small motors and explain there is a magnet inside. If we connect up a power source in a circuit, we can create a force. The Motor spins, the same way the coil spun around the battery and magnets earlier.
Activity 3: 25 mins
Now, Let’s Experiment! Tell the children we are going to use this to make Robots! If we attach the spinning motor on top of two toothbrushes, we can make them shimmy along. Balancing the components is an important part of controlling how the Bristlebot will move.
Hand out the pieces step-by-step, have them stick two blobs of bluetac on the cardboard on the Bristlebot. Next hand out the batteries and multimeter and ask them to measure the potential difference across explaining that it needs to be higher than 1.3V (the batteries are 1.5V) for their Bristlebot to be strong!
Have them stick on the battery and then the motor. Next hand out two wires and get them to link up the circuit. Mind the prongs on the top of the motor as they are delicate. The children will probably need help bending the wires and fixing them into the prongs.
Set the Bristlebots up in the arena and have them fight!
Arena Rules:
- During the battle only allow tutors to have their hands in the arena.
- If your robot falls over, you’re out.
- If your robot stops moving, you’re out.
Get the children to evaluate their robot and improve its design.